

ACParadise Network:
American Cosplay Paradise
American Cosplay Experience
American Cosplay Snapshots
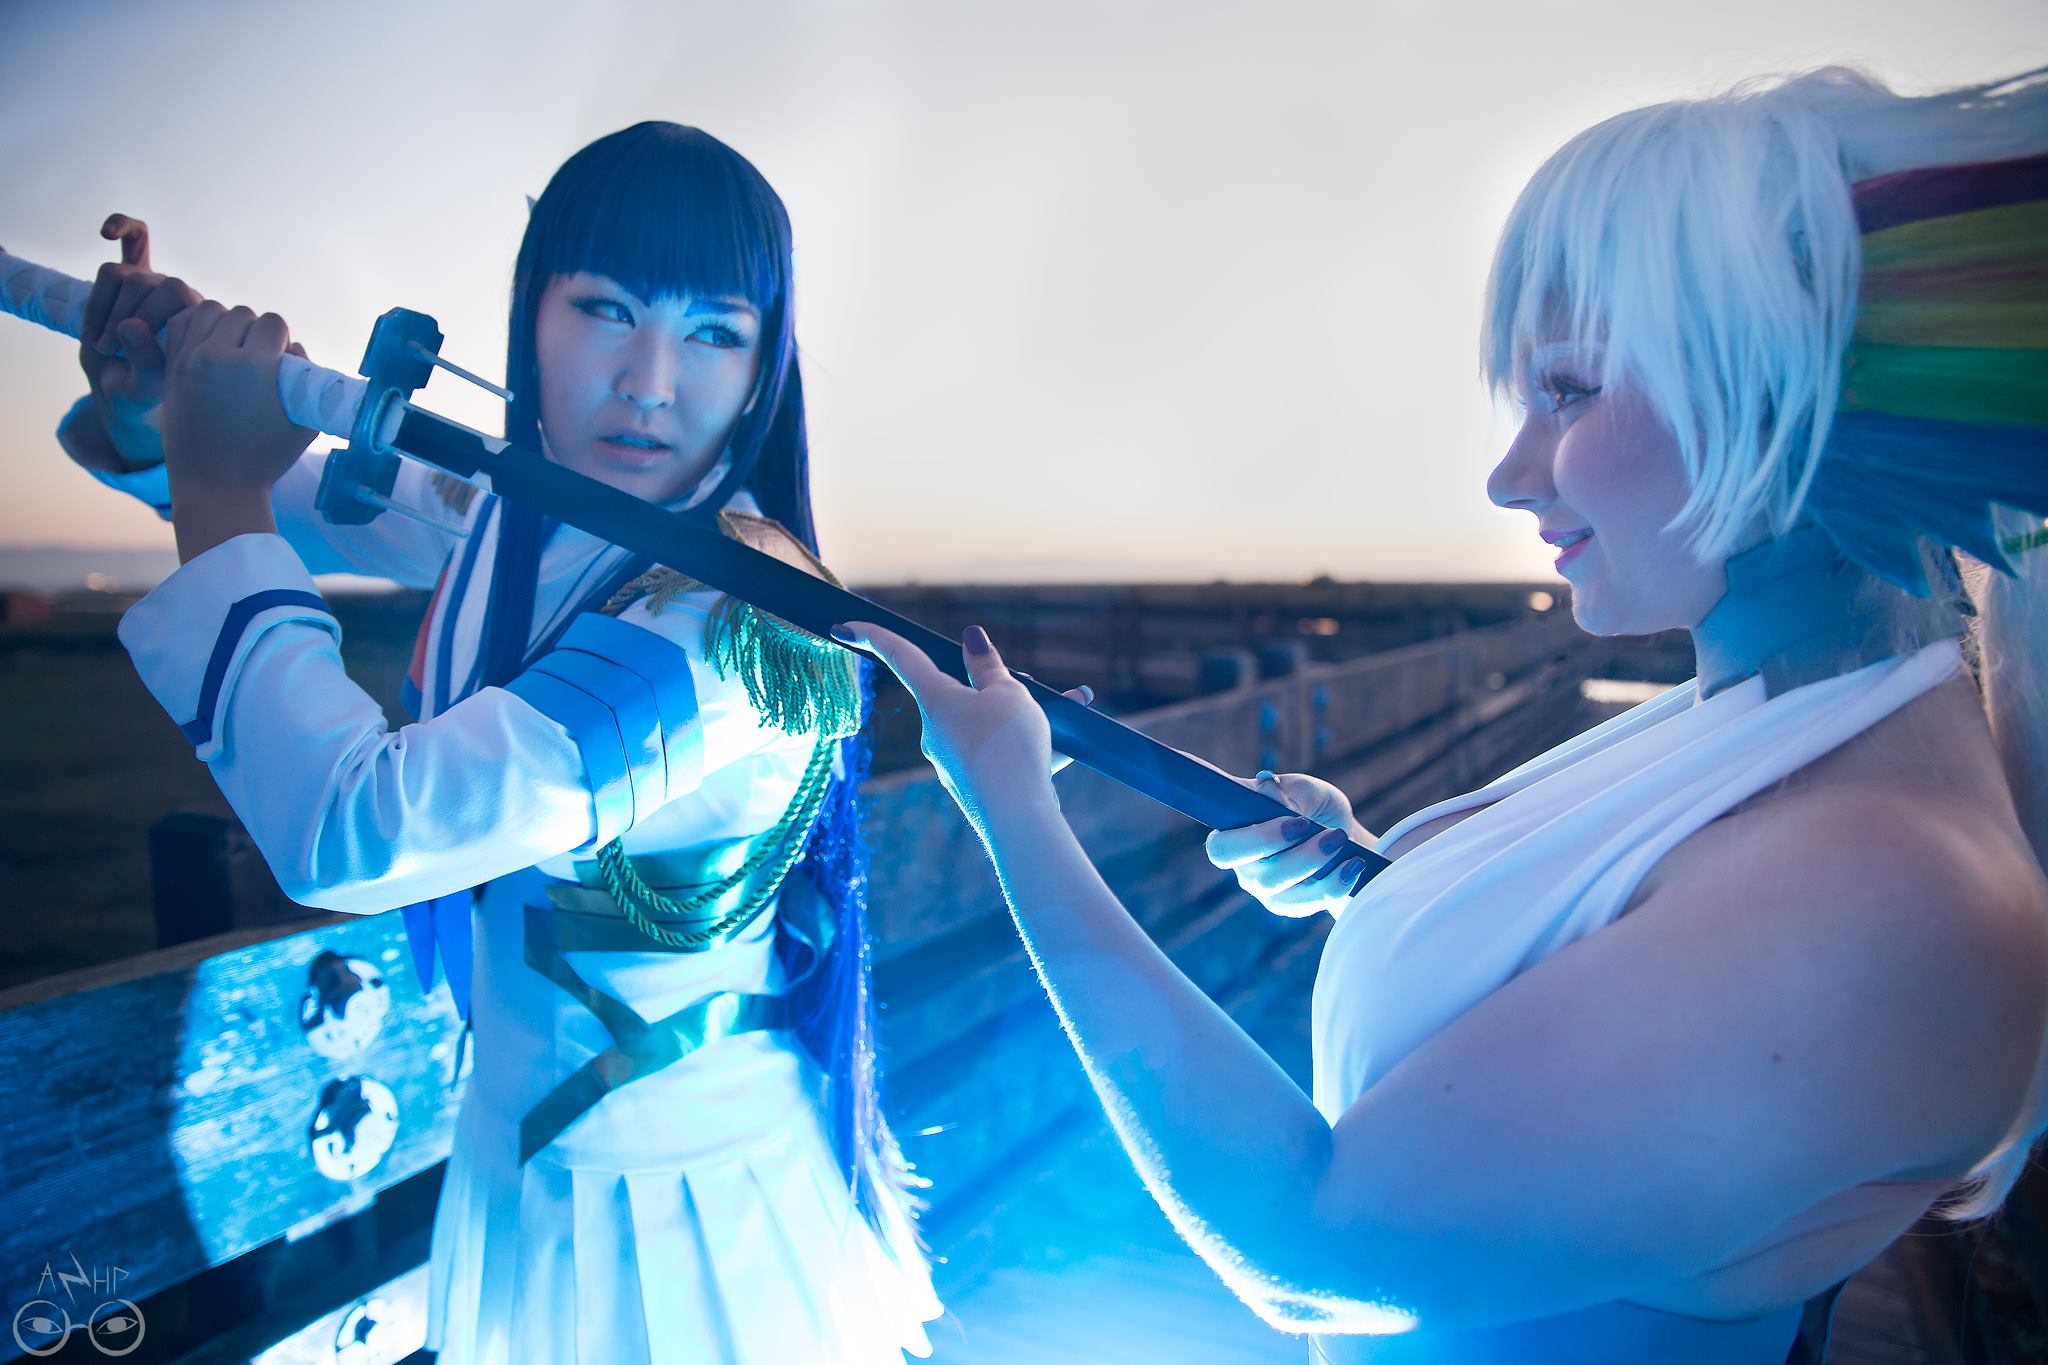
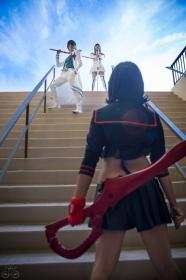
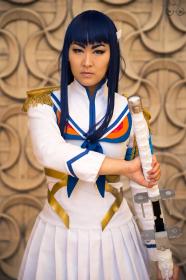
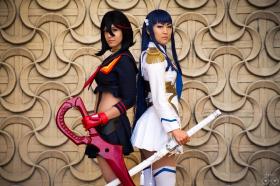
Cosplayer Crystalike > Costume of Kiryuuin Satsuki (Kill la Kill)
- Most Recent Photo
- 11-20-2014
- Series
- Kill la Kill
- Character
- Kiryuuin Satsuki
- Year Completed:
- 2014
- Construction Difficulty:
- Awards
- Hall Costume Award
- Costume worn at:
- Anime LA 2014
About this Costume
- Construction Details:
-
Kiryuin Satsuki costume writeup:
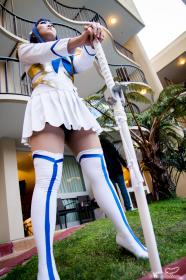
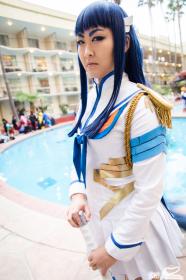
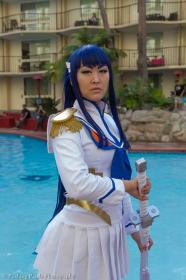
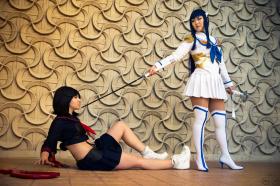
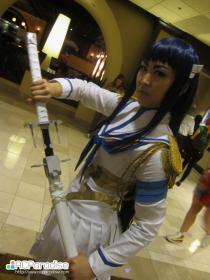
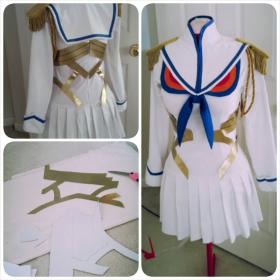
Satsuki's school uniform, the Kamui Junketsu is a pretty simple costume when dissected down to the basic parts. I interpreted her dress as a long sleeve fitted shirt with cuffs, a pleated skirt attached to the shirt bottom, separate boots, and an angry looking sailor collar with epaulettes and a mandarin style collar around the neck. The details make the costume: the sword, epaulettes, collar face, gold wrap around the torso, and the badass attitude ;D
Fabric choices: white stretch jean material: I knew I needed a crisp, easy to pleat, slightly stretchy fabric for the top and skirt, and after touching almost every single white fabric available in my local Joanns, I decided on this two way slight stretch jean material fabric since it was thick, durable, and seemed to hold pleats well without wrinkling. I purchased yards of blue cotton double fold bias tape from Dove Original Trims, white 4 way stretch cotton spandex fabric for the leggings, kona cotton for the Junketsu eyes, scrap red vinyl and orange fabric for the eyes, white invisible zipper, blue swim spandex, tan heels from Payless.
Wig: The wig is a blue/black blend from a wig seller on Aliexpress here: http://www.aliexpress.com/item/Kuroyukihime-100cm-dark-blue-black-long-straight-synthetic-cosplay-costume-wig-free-shipping/795166658.html it's incredibly soft and silky, and was so easy to style. The wig bangs were cut by myself and the shorter sides were also cut by myself in the hotel room. I barely needed to condition or detangle this wig, and it's amazingly long! I need to buy more from this seller because wow, I've never worn a wig this long without getting it tangled in everything.
1. Epaulettes: My very first thing to do were the epaulettes, since I love doing detail work on costumes and small prop things like that, and after studying various tutorials on how to create epaulettes, I used two layers of thin craft foam glued together with a crackly gold vinyl from Joanns glued around that, and glued various gold trims and fringes around. The overall look was very rich, but not overly decadent or lacy. I love my epaulettes and consider them a highlight of my costume. Next, gold thick cord was bought for the loops under Satsuki's left arm. These were sewn together and sewn to the left epaulette as well.
2. Cuffs: the cuffs were a fun shape, I draft things onto newsprint, pin, test, go to muslin, pin and test, and then went to the real fabric, the white jean material that I used two layers for. It's simple geometry to draft half the pattern, and mirror that on the other side. I purchased 25 yards of blue bias tape in Cobalt Blue from Dove Original Trims here: http://www.doveoriginalstrims.com/Cobalt-Double-Fold-Bias-Tape-50-Yds.-12-Inch-7689 who mailed it to me within 4 days. The local Joanns had no blue color that was right, and I didn't want to custom dye it myself so I splurged and bought bias tape online, praying that it would be the right color.
3. Collar. The collar was the first thing I did for the costume, I had already done a similar "floating sailor collar" for my Sword Art Online Asuna costume and from that, drafted out the mandarin style collar and the sailor collar part onto muslim. I repeatedly held up the muslin mockup to my mannequin to check where the collar point would start. The beginning of the collar on the chest is a crucial point to get Junketsu's eyes to look right. The collar was made of the white jean fabric with the stretch going horizontally, out of two layers, and it ended up being pretty sturdy without needing interfacing. I did iron it flat post sewing (should have done pre-sewing) to keep it down. Then I added the blue bias tape, pinned down, sewed with a straightstitch on both sides, and the "mitered" corners are actually raw edges of the bias tape zigzagged down. :P the stitch in the ditch method would have been nice to do, but time was crucial. The hardest part was sewing down the blue bias tape properly near the front of the collar, as an even amount of white had to show, and sewing the curve of the mandarin collar at the top required more concentration.
4. Shirt: Next was the shirt, which was not easy since I tried to learn draping on the dressform as I went, and that didn't work quite well so I resorted to my usual method of picking a formfitting shirt, tracing around that onto newsprint, and made a pattern that way. I did include darts under the bust so the shirt would fit me well, but Satsuki's sleeves are a little loose (refer to the cuffs) so I drafted a long sleeve pattern with arms that were not skintight. I bought a long 22 inch invisible zipper in cream since white was missing from the store, and installed that in the back. The cuffs I made previously were machine sewn on, but I am unhappy with the puckered look and am going to shorten the sleeves, and handsew the cuffs on in the near future.
5. Skirt: Holy crap pleated skirts are a pain, and even though I used a pleater board some of the pleats were not quite even. Overall it worked pretty well, to make a pleater board out of manila folder and I pressed roughly 3 yards into pleats. I never make pleated skirts the proper way by measuring things out, I usually end up with excess over haha. Anyway, I ironed the pleats down, hemmed one side, and pinned to the shirt. I opted to attach the pleats straight across instead of curving the attachment since it appeared to be a straight across attachment in the character art turnaround. I repeatedly pinned the skirt on inside out over and over, so please check your pinning before you sew X_x.
6. The collar eyes and details. Junketsu's eyes were patterned out of paper, held up to the mannequin, and cut out of the blue kona cotton. By the way, from all the reference and screenshots I could find or collect, the blue of the eyes does not match the rest of the bias tape on Satsuki's uniform. The orange and red eyes were cut out, pinned, and appliqued on with a tiny zigzag stitch. I preferred the stitched look versus the glued on or shiny vinyl look since it's a magical uniform… the eye placement was pinned, tested with the collar, and then the blue collar tie and "mouth" were made as well out of the kona cotton. The epaulettes were then handsewn down to the sides of the sailor collar and the top part of Junketsu was complete.
7. The gold torso wrap: I had leftover gold vinyl so I barely had enough to use for Satsuki's costume. I fused gold vinyl with fusible interfacing after testing applique, glues, magnets, and heat n bond. I tried drafting out a paper pattern onto the dress on my mannequin, but struggled, so I opted to use painter's tape instead so I could really see what I was patterning without damaging the dress and to make it easy to fix. Painter's tape is seriously a great patterning/pinning tool! Here's a rough pattern of my gold parts around my torso:
I fused the gold vinyl to the interfacing for stability, traced around my pattern, cut it out with scissors, held up each piece to the mannequin, and marked where they would lie.
I decided to not interfere with the stretch of the white fabric around my chest so I decided to use a stickleback velcro in specific places to attach the gold vinyl in place. This might be changed in the future.
8. Boots: I bought tan pointy toe heels from Payless after trying various styles and heights on. Satsuki's boots have a point, so a rounded toe wouldn't work, and while my heels are slightly thinner than hers, the height was roughly pretty accurate. The rest of the bootcover was the hardest thing. I patterned a boot out of plastic wrapping my leg and painter's tape to get the shape of my leg, and cut that shape out of the white 4 way stretch fabric I bought and cut vertical strips of the blue swimwear spandex. I sewed the blue strips between the layers of white fabric, messed up twice since I made my pattern too big, and kept cutting the blue fabric too large as well. The tops with the blue and then the white were a patterning/sewing nightmare for me. My final result works, but I might go back and redo them a different way. The front of the heel slips into the point of the bootcover, and the material around the heel was glued on with E6000 at the con. The bottom of the heel was painted blue with acrylic paint, and thanks to Lindsey's suggestion, non-slip shoe bottoms were attached so I wouldn't go flying across smooth surfaces. The boot tops are held up with double sided sticky fashion tape, which clung to my dance tights super well all day long. I patterned my stuff to be more like a stocking with an empty space for the heels to poke through.
9. Sword: Satsuki's sword, the Bakuzan is a pretty unique sword due to the decorated hilt and the black blade. I bought a cheap Rukia Kuchiki wooden sword off of Amazon, here's the link: since it's con friendly and light due to it all being made of wood. The white hilt and sheath were also a plus.
Trevor did all the work on the sword, and he can attest to the hilt portion being incredibly difficult. It's mainly foam board, craft foam, thick foam sanded down, and wooden dowels. I can open the Bakuzan, and I'm proud of how well he made it. ♥
10. Armband, hairclips: The armband was made by trevor out of two layers of blue craft foam. The way he patterned it is pretty good, and it closes with industrial strength velcro and with thin black hairbands tied around through the grooves of the "layers" which helps emphasize each layer. It slips onto my left arm very easily. The white hairclips are also craft foam, white 2 mm craft foam e6000 glued to hairclips.
Final thoughts: It's incredible to see how different I look and feel when I put everything on. I hadn't had a chance to test wear it all together before the con, so seeing the transformation with the makeup, wig, eyebrows, costume, and the sword silenced any second thoughts or doubts I had. The angry eyebrows I drew on scared some people away for sure, and the satisfaction I had in wearing this costume that I worked so hard on was great. I got to meet so many of my friends and so many new friends while wearing this, and I have to thank Yazy and Matt for asking me to do this. Satsuki is such a powerful woman, I hope I was able to embody even a fraction of her spirit, and I plan to wear this again and again.
Materials bought: blue wig ($19) white dress fabric ($25) fusible interfacing ($5) white 4 way stretch fabric ($7), blue collar fabric ($4), blue bias tape ($24), blue swimwear stretch fabric ($10), tan heels $2 (thanks to giftcard), gold tassels, white tassels ($12)
Total estimated cost: $108+/-
Hours put in: 30. Roughly stretched across 4 days.
Comfort: 9/10 Ease of movement, warm, nothing restricting, no problems walking.
Add a Comment


Sorry, you must be a registered user of and logged in to view and add comments. Either log in or register now!